
Osm Admin: Forms
2 years ago ∙ 3 minutes read
In Osm Admin, a form is an integral part of the class user interface. It's a very specific kind of HTML form.
In this article, I'll review what's in a class form, and how it's reflected from the application code.
Contents:
Inside A Form
Let's begin with an example - the scope form:
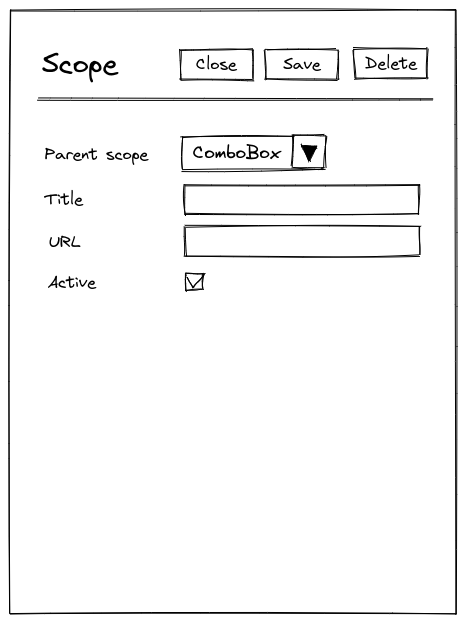
Fields
As you can see, form have a field for each class property. Some properties are rendered as input fields, some as switches. There will be a lot more field types.
Although it's not reflected in the image above, each field may display a help notice explaining its intended use, or, if entered value is invalid, an error message.
Some fields may have a button that opens a picker - a popup that helps to select a value from a list, a calendar, or a color palette.
Finally, a field may have a default value, and a user may either enter a custom value, or press a button to use the default one.
Fieldsets
In a non-trivial form, fields are logically grouped into fieldsets.
Some properties occupy the whole fieldset rather than a single field. For example, order lines are displayed as a grid inside an order form, and this grid is "worth" having a dedicated fieldset.
Sections
Even larger forms are divided into sections. On a large screen, each section is shown in a separate tab inside a form. On a mobile device, additional navigation helps to navigate to a specific section.
Chapters
Finally, in a very large form, sections are grouped into chapters.
Modes
A form operates in one of the following modes:
- In edit mode, the form loads an existing object into its fields, and updates the object with the modified field values when the
Savebutton is pressed. While editing, user see what fields are modified, and can discard changes in an individual field by pressing a button. - In create mode, the form fills its fields with sensible defaults and creates a new object when the
Savebutton is pressed. - In mass-edit mode, the form loads multiple selected objects into its fields, updates all the objects with the modified values when the
Savebutton is pressed. If objects have different values of a certain property, then the field indicates that. - In read-only mode, the form doesn't allow editing fields, and there is no
Savebutton. Not that some fields may be read-only in other modes, too.
Buttons
A form has buttons for user to initiate operations on the edited object(s), or ease the navigation:
- the
Closebutton discards any changes, and navigates to the grid. - the
Savebutton, depending on the form mode, creates new object, or modified existing one(s). - the
Deletebutton deletes selected object(s) from the database. - for class-specific custom operations, more buttons may be shown.
Other Forms
As you see, a class interface form is a very specific kind of form.
Most probably, Osm Admin will have some other forms, too. Such forms will be implemented independently, maybe reusing some parts of the class interface form implementation.
Form Model
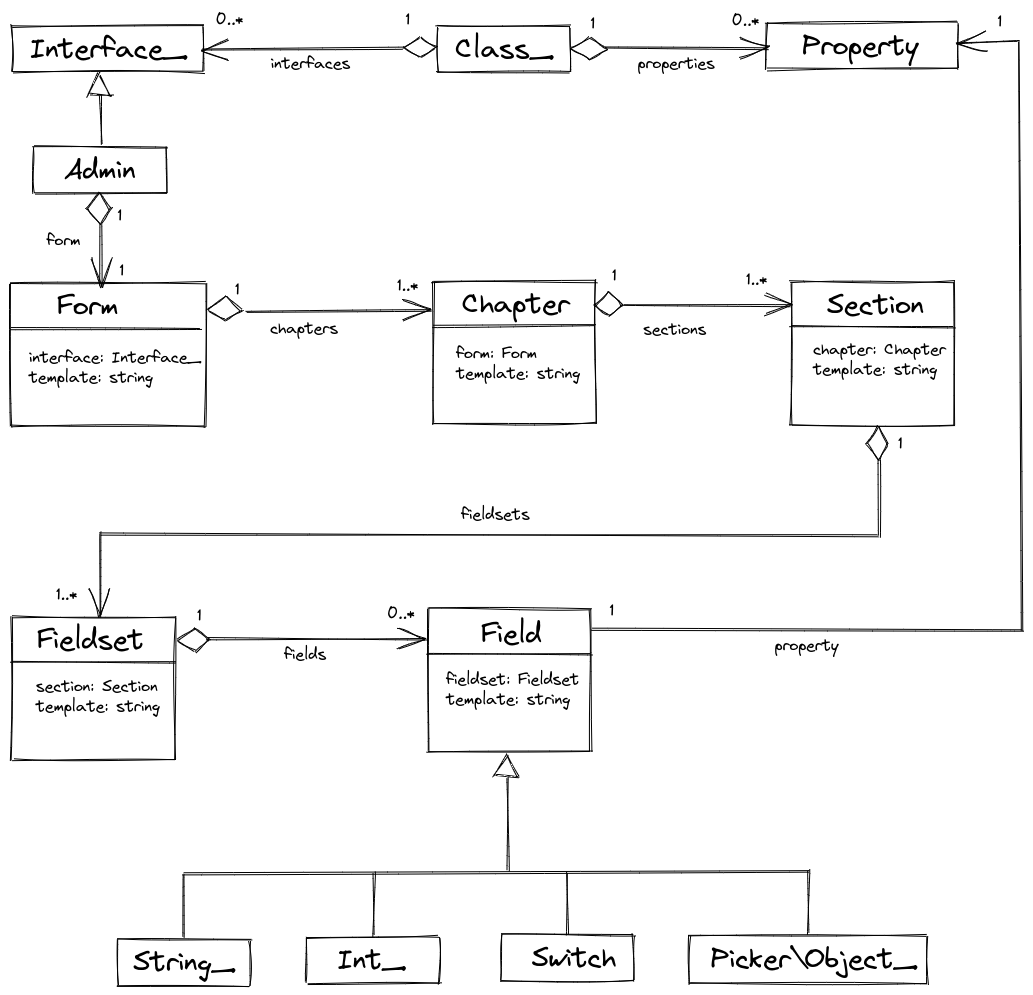
Form structure is inferred from the application's source code into the following model:
Form Rendering
A Form object, and its child objects define static structure of a form.
It's rendered by the GET /create and GET /edit routes of the class interface. These routes pass the form object along with the dynamic form data - form mode, query that specifies what objects are edited, and the data of edited object(s):
public function run(): Response
{
    return view_response($this->form->template, [
        'form' => $this->form,
        'mode' => $this->mode,
        'query' => $this->query,
        'object' => $this->object,
    ]);
}
The form template renders its child objects, recursively, using Blade templates specified in their template property.
Form Configuration
The application collects the form configuration from the data class attributes. Every displayed property defines how exactly it's displayed using #[Form\*] attributes:
/**
 * @property ?int $parent_id #[
 *      Serialized,
 *      Table\Int_(unsigned: true, references: 'scopes.id', on_delete: 'cascade'),
 *      Form\Int_(10, 'Parent Scope'),
 * ]
 * @property ?string $title #[
 *      Serialized,
 *      Form\String_(20, 'Title'),
 * ]
 * ...
 */
#[Interface\Admin(...), ...]
class Scope extends Object_ {
    ...
}
The default Form class defines a single chapter, a single section, and a single fieldset, and puts all the fields into it.
These chapter, section and fieldset are implicit, meaning that they just render contained fields without any visual fieldset captions or tabs around them.
In order to customize the default form layout, define a custom form class:
#[Of(Scope::class)]
class ScopeForm extends Form {
    protected function load(): array {
        /* @var Chapter[] $chapters */
        $chapters = parent::get_chapters();

        $chapters['']->sections['']->fieldsets['site'] = Fieldset::new([
            'title' => __('Site'),
        ]);

        return $chapters;
    }
}
The implicit parts have empty internal names, while the custom ones are not. For example the custom fieldset added to the default section name is site.
Back in the data class, assign fields to the custom parts using {chapter}/{section}/{fieldset} notation:
/**
 * ...
 * @property ?string $site_title #[
 *      Serialized,
 *      Form\String_(20, 'Title', in: '//site'),
 * ]
 */
#[Interface\Admin(...), ...]
class Scope extends Object_ {
    ...
}